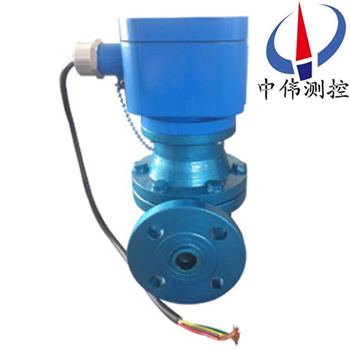
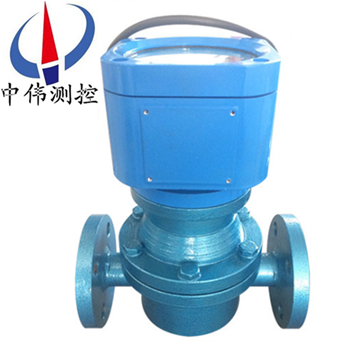
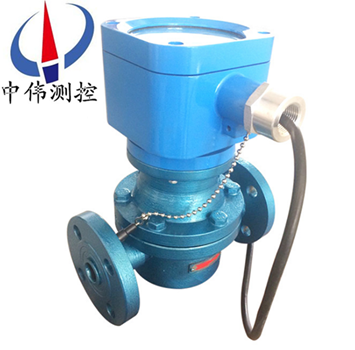
Electronic oval gear flowmeter
ZW - LC seriesElectronic oval gear flowmeterIs a kind of displacement measuring instrument, mainly by measuring housing, gear and transmission parts.Used in the pipe fluid flow continuous or discontinuous measurement and control instrument.Has remote display the function of the instantaneous flow and cumulative flow, can be combined with most of the control system, realize the automation of traffic detection and control.To instructions given cumulative flow and transient flow, and a single flow, etc., can output pulse signals, 4-20 ma, or 1-5 v analog signals, 4-20 ma + HART, MODBUS, support 232485 communication, etc.And mechanical batch controller or electronic control device, which can realize different types of filling, batch control and other functions.
Second, the working principle:
ZW - LC series electronic measurement part of the oval gear flowmeter is mainly composed of two mutually meshing elliptical gear and shell (measuring room), elliptical gear turn every week the parallelism of the measured medium quality for half moon volume 4 times, by the elliptical gear meteor millions of volume flow rate Q: Q = 4 n nu 0
Type:
N - the rotation of the elliptical gear frequency (r/s);
Nu 0 - half moon part volume (Mr.).
So, in the half moon volume of the oval gear flowmeter nu 0 given conditions, as long as the measure of elliptic gear rotational speed n, can know the measured medium flow.
Elliptic flow meter flow signals (that is, the elliptic gear rotating speed n) showed that has two kinds of on-site display and remote transmission.
In situ show that the gear rotation through a series of deceleration and adjust speed than institutions, directly connected to the instrument panel on the indicating needle, and the total amount after mechanical counter display.
Far eastone shows mainly through the reduction gear after * magnet rotates, making spring relay contact with * magnet synchronization to make or break the rotation of the same frequency, thus far to another display instrument issued by electrical impulses.
Applications:
ZW - LC series electronic oval gear flowmeter for diesel, gasoline, jet fuel, lubricating oil metering, can cooperate with ZW - quantitatively control the flow totalizer.especially XMJA series, the series flow meter is mainly used in petroleum, chemical industry, oil products, etc.
1, ZW - LC - A cast iron type flowmeter, it is widely used in all kinds of oil products and for the measurement of the cast iron is not corrosive liquid medium;
2, ZW - LC - E cast steel type flowmeter, used in high pressure, low corrosive medium measurement;
3, ZW - LC - B stainless steel type flowmeter is widely used in strong corrosive liquid medium, such as acid, alkali, salt and the measurement of organic compounds, etc.
Four, the main features:
1, to adopt advanced technology of non-contact letters;
2, high precision, affected by the liquid viscosity changes little;
3, small resistance, is particularly suitable for small flow measurement;
4, intrinsically safe explosion-proof, explosion-proof marks ExiaIICT5;
5, 5 VDC input voltage current 24 ma associated equipment: security gate.
Five, the technical parameters:
1, allows basic error: plus or minus 0.1%, plus or minus 0.2%, plus or minus 0.5%;
2 DN, nominal size (mm) : 4 ~ 300;
3, nominal pressure PN (M.P a) : cast iron, stainless steel (P) (a) 1. 0, 1.6, 2.5, 4.0, 6.3;Cast steel (E) 2.5, 4.0, 6.3, 9.6;
4, the liquid temperature to be tested: low temperature type - 40 ~ + 60 ℃ and room temperature type - 10 ℃ ~ + 80 ℃ temperature type - 10 ℃ ~ + 200 ℃ high temperature type - 10 ℃ ~ + 300 ℃;
5, and measured liquid viscosity (mPa) s) : 0.3 ~ 50000;
6, pipe connection: GB/T9118-2000 standard flange (China);NIST (the standard flange);BSPT (British standard pipe thread) : NPT (American tapered pipe thread);
7, the scene show: 99999999 L (traffic) 9999999.9 L (single flow) 9999999.9 L (instantaneous flow);
8, the output signal, the pulse signal, 4 ~ 20 ma, 1-5 v, 4 ~ 20 ma + HART protocol, the MODBUS support RS232 and RS485 communication (optional);
9, explosion-proof grade: EXiaIIBT5, EXiaIICT5 protection grade: IP65.
Six, measurement requirements:
1, the flow measurement has nothing to do with the flow of the fluid, it is because the oval gear flowmeter is depend on the measured medium pressure head driving elliptical gear rotating and measure.
2, the greater the viscosity of the medium, from gear and measuring the less empty clearance leakage of the leak out, therefore the greater the nuclear medium sticky skin, the smaller the leakage error, to measure more advantage.
3, high measuring accuracy, suitable for high viscosity medium flow measurements, but not containing solid particles of fluid (solid particles will gear jammed, so that you can't measure traffic).If the mixed with gas in the liquid medium to be measured, can also cause measurement error.
Seven, error calculation and adjustment:
1, the basic error of flowmeter, by the verification flow point of all measured values respectively press type calculation: (volume) E = Vm - 100% (V/V
E - meter error (generally refers to the cumulative error) take two significant figures.
The Vm - meter measured values (i.e., values)
V - were revised, flowmeter standard device measured value (that is, the actual value) from the basic formula of error, when the Vm > V, flowmeter fundamental error for "+" values, said flowmeter is going faster.
Vm < V, flowmeter basic error for "-", said flowmeter walked slowly.
2, in order to make the error of flowmeter, within the basic error limit is often the need for error.By changing in counter namely inside a pair of adjusting gear (tooth) are adjusted to change the mechanical transmission ratio, so that the flow meter's worth to adjust.
3, error adjustment can't change the flow characteristic of the flowmeter, the characteristic curve of artificially in a new coordinate system.
4, in general, in the rules (or actual use) flow within the scope of its basic flow check point error range is not big five, the regulation accuracy of basic error limits, all can be adjusted by the error flowmeter qualified basic error.
Flow meter has been used, usually with the adjustment of the original gear set first for error detection, and then according to the error of the specific situation to adjust error.
Eight, installation and use:
1, instrument installation should be in the direction of the arrow direction as shown on the instrument shell and fluid flow in the same direction, the installation position should be paid attention to easy reading.
2, instrument installation in normal temperature situation as far as possible, do not install with the occasion of the harmful gas and strong heat radiation, prevent the meter counter parts from damage.
3, instrument of the gear shaft installed into a horizontal position as much as possible, immediately dial should be installed in vertical position (dividing "0") should be in the above, in order to reduce the friction between elliptical gear and shell, the lower parts of wear and tear.Due to the installation position is different, in order to facilitate reading, counter (header) can be rotated 90 ° or 180 °.
4, instrument before installation, pipeline must be thoroughly cleaned and in the whole pipeline system, without strict filtering device, filters should be installed in front of the instrument, to prevent impurities into the table.
5, meter should be installed at the outlet of the pump, flow control valve should be installed on the downstream side of the instrument.When used to open the upstream shutoff valve and then slowly open the downstream flow regulation or globe valve.It is forbidden to suddenly open or closed.
Nine, note:
1, right after installation, in accordance with the requirements when using can ensure enough accuracy, usually the cumulative value of precision can reach 0.5, is a more accurate flow meters.
2, however, if the use of the measured medium flow rate is too small, the instrument will highlight the influence of the leakage error, can't guarantee enough accuracy of measurement.
3, therefore, different specifications have a permitted to use the traffic, only when the actual measured flow is greater than the lower limit value, the measurement precision can be guaranteed.
4, secondly, when using, pay attention to the temperature of the measured medium cannot be too high, otherwise not only can increase the measurement error, and there are may be stuck in the gear.
5, therefore, in the instrument by using temperature range.Use for a long time after the gear flow meter, the internal gear are corrosion and wear and tear, which affect measurement accuracy.
6, therefore, often should observe, and regularly check removed, if conditions permit calibration on a regular basis as far as possible.
Ten,The dimensions:
table1, the size of the standard shape: unit: mm
Nominal diameter | L | H | A | B | D | D1 | N (a) | Φ |
10 | 150 | 100 | 165 | 210 | 90 | 60 | 4 | 14 |
15 | 170 | 118 | 172 | 226 | 95 | 65 | 4 | 14 |
20 | 200 | 150 | 225 | 238 | 105 | 75 | 4 | 14 |
25 | 260 | 180 | 232 | 246 | 115 | 85 | 4 | 14 |
40 | 245 | 180 | 249 | 271 | 145 | 110 | 4 | 18 |
50 | 340 | 250 | 230 | 372 | 160 | 125 | 4 | 18 |
65 | 420 | 325 | 270 | 386 | 180 | 145 | 4 | 18 |
80 | 420 | 325 | 315 | 433 | 195 | 160 | 8 | 18 |
100 | 515 | 418 | 370 | 458 | 215 | 180 | 8 | 18 |
150 | 540 | 515 | 347 | 557 | 280 | 240 | 8 | 23 |
200 | 650 | 650 | 476 | 720 | 335 | 295 | 12 | 23 |
table2, cast steel, cast steel, high viscosity, high temperature cast steel standard dimension: unit: mm
Nominal diameter | L | H | B | A | D | D1 | N (a) | Φ |
15 | 200 | 138 | 232 | 180 | 105 | 75 | 4 | 14 |
20 | 250 | 164 | 220 | 160 | 125 | 90 | 4 | 18 |
25 | 300 | 202 | 252 | 185 | 135 | 100 | 4 | 18 |
40 | 300 | 202 | 293 | 208 | 165 | 125 | 4 | 23 |
50 | 384 | 262 | 394 | 312 | 175 | 135 | 4 | 23 |
80 | 450 | 337 | 452 | 332 | 210 | 170 | 8 | 23 |
100 | 555 | 442 | 478 | 310 | 250 | 200 | 8 | 25 |
150 | 540 | 510 | 557 | 347 | 300 | 250 | 8 | 26 |
200 | 650 | 650 | 720 | 476 | 36 | 310 | 12 | 26 |
Cast iron, cast steel, high temperature type standard dimension: DN15 ~ DN25, A and B size according to the above-mentioned data add 160 mm hot extension tube: DN40 ~ DN80, A and B size according to the size of the table with 300 mm hot extension tube, the rest of the size with the table size accordingly.
Table 3, stainless steel type standard dimension: unit: mm
Nominal diameter | L | H | B | A | D | D1 | N (a) | Φ |
15 | 208 | 120 | 228 | 172 | 95 | 65 | 4 | 14 |
20 | 236 | 150 | 238 | 225 | 105 | 75 | 4 | 14 |
25 | 287 | 195 | 246 | 232 | 115 | 85 | 4 | 14 |
40 | 265 | 178 | 349 | 265 | 145 | 110 | 4 | 18 |
50 | 265 | 178 | 349 | 265 | 160 | 125 | 4 | 18 |
65 | 365 | 260 | 436 | 319 | 180 | 145 | 4 | 18 |
80 | 420 | 305 | 459 | 324 | 200 | 160 | 8 | 18 |
100 | 515 | 400 | 554 | 373 | 220 | 180 | 8 | 18 |
150 | 540 | 515 | 607 | 397 | 280 | 240 | 8 | 23 |
Eleven, measuring range:
Ordinary cast iron type (AType), cast steel,EType), stainless steel,B)
model | ZW-LC-ACast iron | ZW-LC-ECast steel | ZW-LC-BStainless steel | |||
Nominal pressureMpa | 1.0 1.6 | 2.5 4.0 6.4 | 1.0 1.6 | |||
Fluid viscosity to be tested | 2 ~200 Mpa.s | |||||
Liquid temperature being measured | - 20℃ ~+ 100℃ | |||||
flow The amount van wai m3/h | ||||||
model | ZW-LC-ACast iron | ZW-LC-ECast steel | ZW-LC-BStainless steel | |||
Nominal diameter | 0.5 | 0.2 | 0.5 | 0.2 | 0.5 | 0.2 |
10 | 0.04~0.4 | 0.1~0.4 | 0.04~0.4 | 0.1~0.4 | 0.1~0.5 | 0.1~0.5 |
15 | 0.25~1.5 | 0.3~1.5 | 0.25~1.5 | 0.3~1.5 | 0.3~1.5 | 0.3~1.5 |
20 | 0.5~3 | 0.6~3 | 0.5~3 | 0.6~3 | 0.6~3 | 0.6~3 |
25 | 1~6 | 1.2~6 | 1~6 | 1.2~6 | 1.2~6 | 1.2~6 |
40 | 2.5~15 | 3~15 | 2.5~15 | 3~15 | 3~15 | 3~15 |
50 | 4~24 | 4.8~24 | 4~24 | 4.8~24 | 4.8~24 | 4.8~24 |
65 | 5~40 | 8~40 | 5~40 | 8~40 | 8~40 | 8~40 |
80 | 10~60 | 12~60 | 10~60 | 12~60 | 12~60 | 12~60 |
100 | 16~100 | 20~100 | 16~100 | 20~100 | 20~100 | 20~100 |
150 | 32~190 | 38~190 | 32~190 | 38~190 | 38~190 | 38~190 |
200 | 34~340 | 68~340 | 34~340 | 68~340 | 68~340 | 68~340 |
Twelve, selection of coding:
The type code | logo | Material symbol | Nominal diameter | Nominal pressure | counter | transmitter | precision | Instructions (in the wei and control) |
ZW-LC- | Oval gear flowmeter | |||||||
H | Welded steel flow meter | |||||||
U | Heat preservation jacket flowmeter | |||||||
N | High viscosity liquid flow meter | |||||||
SP | Food with a flow meter | |||||||
T | High temperature type flowmeter | |||||||
Q | Measuring gas flowmeter | |||||||
A | Cast iron material | |||||||
E | Cast steel material | |||||||
B | Stainless steel material | |||||||
10 | For nominal diameter10mm | |||||||
15 | For nominal diameter15mm | |||||||
…… | ||||||||
200 | For nominal diameter200mm | |||||||
1 | 1.0MPa | |||||||
2 | 1.6MPa | |||||||
3 | 2.5MPa | |||||||
4 | 4.0MPa | |||||||
6 | 6.3MPa | |||||||
A ,A1 | Used forDN40The following,A1With the transmitter | |||||||
J1 | Used forDN50Above, can take transmitter | |||||||
A5 A6 | A5Single pointer word wheel display | |||||||
GF-Ⅰ | 12VThree wire system photoelectric transmitter | |||||||
GF-Ⅱ | 24VThree wire system photoelectric transmitter | |||||||
MF | 4~20mATransmitter output | |||||||
DF | Liquid crystal display with remote transmission4-20mA | |||||||
J1 | 0.2Level of accuracy | |||||||
J2 | 0.5Level of accuracy |
13, design selection and order notes:
1, choose oval gear flow timing, it is suggested that according to the measured liquid flow control meter flow range of 30 ~ 70% choose specifications;According to the fluid temperature, and the size of the pipeline pressure, and corrosion properties of liquid viscosity, etc to select flowmeter types;
2, when ordering, please specify the model of flow meter, diameter (mm), whether to ask explosion-proof, name of the medium, flow range (m3 / h), work pressure (MPa), temperature (℃), medium viscosity (MPa) s), to measure the corrosion medium, the user must also specify the medium corrosion properties, medium concentration (%), medium temperature (℃);
3, this product can according to user requirements, within the header assembly electrical/current transmission device;
4, when ordering parts, please click and fill in the figure, the collapse of the list;
5, user, if you have special request, please put forward in order;
6, our company can provide filters, venting device with flow meter, intelligent flow integrating instrument.
After-sales service commitment:
1, our company sold by flow meter series products within twelve months appear quality problem, is responsible for free maintenance.
2, the warranty period, any quality problems such as the products of our company, my company is responsible for free repair or replacement.
3, the warranty period, such as user improper use, damaged products, my company is responsible for the maintenance, charge damage parts cost.
4, after the warranty period appear quality problem, my company is responsible for the maintenance, charge damage parts cost.
5, such as user need to my company site services, to users in the province I company service personnel to reach the site within 12 hours, fujian association of foreign languages and user reach the site within 48 hours.


